How to Make HTTP Requests in Node.js Using Fetch API


Vilius Dumcius
Last updated -
In This Article

Ready to get started?
Most communication on the web happens through HTTP requests. Browsers send them to servers to fetch the information to display. Servers use them to communicate with each other.
So knowing the ins and outs of HTTP requests is a valuable skill to have for any web developer.
In this article, you’ll learn about one of the most common ways to make HTTP requests in Node.js: Fetch API.
We’ll answer the following questions:
- How to use Fetch API?
- How to send POST requests with Fetch API?
- How to access response status codes in Fetch API?
- Who wins in a fight between Fetch API and Axios?
- Can you use proxies with Fetch API?
What Is Fetch API?
Fetch API is a promise-based interface for making HTTP requests to servers.
It’s a simple way to fetch resources from servers without using any additional JavaScript libraries. The API is available in all major browsers and Node.js versions starting from Node 18.
How to Use Fetch API in Node.js?
In this part of the article, you’ll learn how to use Fetch API and the various features it offers.
Setup
To use the Fetch API natively in Node.js, you need a version of Node that’s 18 or higher.
You can check the current version of Node with the node -v command. If it’s below 18, please use the official instructions to update it before following the tutorial.
You’ll also need to create a new Node.js project to follow the code examples. To do that, create a new folder called fetch_example, move to it, and run npm init in your terminal. Use the defaults that the installation provides.
After installing, add the following to the package.json file:
"type": "module".


// [ …]
  "description": "",
  "type": "module"
}
Now you’re ready to learn more about the Fetch API! 🥳
The fetch() Function
At the basis of the Fetch API is the fetch() function. Provided a request, it returns a promise for a response that the server will return at some point. You can then chain functions on the promise using the .then() syntax.
Let’s see how we can use Fetch to request data from the DummyJSON quotes API .
In the code example below, we request all the quotes from the server, then convert the response from a string to a JS object using .json(), and then print each quote in the console.
To try it out, paste the following in the index.js file and run it with node index.js.
fetch('https://dummyjson.com/quotes')
  .then((response) => response.json())
  .then((response) => response.json())
  .then((json) => {
    json.quotes.forEach(quote => console.log(`${quote.quote} -- ${quote.author}`));
  });
Here’s the output it returns:
Life isn’t about getting and having, it’s about giving and being. -- Kevin Kruse
Whatever the mind of man can conceive and believe, it can achieve. -- Napoleon Hill
Strive not to be a success, but rather to be of value. -- Albert Einstein
...
You can also use Fetch API to request HTML pages. But since it doesn’t have any built-in tools for parsing the content, you need to use a library like Cheerio or node-html-parser to get the data you need out of the HTML.
Exception Handling (HTTP Status Codes)
What do you think will happen if you try to fetch a mistyped URL using fetch()?
fetch('https://dummyjson.com/quotess')
  .then((response) => response.json())
  .then((json) => {
    json.quotes.forEach(quote => console.log(`${quote.quote} -- ${quote.author}`));
  });
Oh no, an error! 😢
SyntaxError: Unexpected token o in JSON at position 1
    at JSON.parse (<anonymous>)
The error happens because the server didn’t return JSON but instead returned a 404 page — something you’ve definitely encountered on the internet. While it’s a valid response, the JSON parser wasn’t able to parse that page.
Since it’s a promise, you might try to handle the error using the .catch() method.
fetch('https://dummyjson.com/quotess')
  .then((response) => response.json())
  .then((json) => {
    json.quotes.forEach(quote => console.log(`${quote.quote} -- ${quote.author}`));
  })
  .catch((error) => console.log(`There's a problem: ${error}`));
It will lead to the following being printed:
There's a problem: SyntaxError: Unexpected token o in JSON at position 1The program doesn’t crash now, but the error is quite unclear for debugging purposes. The problem is that .fetch() only fails if a resource cannot be accessed and not when a 404 is returned.
To handle issues like that, you can check the status code of the response before working on it. If it’s 200, the response should be as expected. If it’s 404, the URL was not valid. Besides those, there are many other status codes .
In Fetch API, you can do this simply by reading the .ok property of the response. It will be true if the status code of the response is 200, and false otherwise.
If it’s not 200, you can use Promise.reject() to raise an error, which will be caught by the .catch() method.
Here’s a code example that handles the error correctly:
fetch('https://dummyjson.com/quotess')
  .then((response) => {
    if (response.ok) {
      return response.json()
    } return Promise.reject("Status code not 200.")
  })
  .then((json) => {
    json.quotes.forEach(quote => console.log(`${quote.quote} -- ${quote.author}`));
  })
  .catch((error) => console.log(`There's a problem: ${error}`));
This will return the following for an URL where you encounter a problem.
There's a problem: Status code not 200.While mistyping a link in a script is a problem that probably should be solved by correcting the URL, error handling can be very useful in programs like crawlers that traverse the web using URLs provided by websites (some of which can be outdated and return a 404).
Sending POST Requests
So far, you’ve only sent GET requests — HTTP requests that request the contents of a certain resource.
There are a few more types of requests like PUT, POST, DELETE, and more. Some of these let you submit requests that change the resources on the server and not just return them.
You can send these requests using the Fetch API as well.
For example, imagine you have a task to be done that you want to submit to the DummyJSON’s todo API .
let todo = {
  todo: "Learn how to send POST requests with Fetch API",
  completed: false,
  userId: 26,
}
You can provide an object to the fetch() method with additional parameters for the request. In this case, you need to provide:
- The HTTP method you want to use (POST);
- Headers that denote the content type: JSON;
- The body you want to attach to the request (todo made into a JSON string).
Here’s how a POST request will look:
fetch('https://dummyjson.com/todos/add', {
  method: "POST",
  headers: { 'Content-Type': 'application/json' },
  body: JSON.stringify(todo)
})
  .then((response) => response.text())
  .then((data) => console.log(data))
The server responds with the item that you just added. The console will print out that item. Since this is a mock API, the database won’t get updated by sending an additional item to it, but it should work for real APIs.
How to Use Proxies With Fetch API?
While sending HTTP requests, you sometimes want to use a proxy to mask your IP address. This can be very useful when you’re doing web scraping with Node js. , but it can also be relevant when you want to mask API usage.
Proxies act as middlemen between your request and the recipient of the request, changing the origin IP of the request to that of the proxy. This way, the server cannot tell that it’s you that’s requesting the information.
Unfortunately, browser-native Fetch API doesn’t support proxies. There’s also no way to use them in the fetch() function that comes by default with Node.
There’s a workaround for that, but it needs two libraries: node-fetch and https-proxy-agent .
First, install the libraries using the npm install command in the terminal.
npm install node-fetch
npm install https-proxy-agent
Then import them at the top of the JavaScript file you’re working with.
import fetch from 'node-fetch'
import HttpsProxyAgent from 'https-proxy-agent';
After that, you need to get hold of your proxy link and register it as an environment variable.
In this article, we’ll be using IPRoyal residential proxies . They provide a cheap and easy way to mask your IP by routing requests through real IP addresses that change on every request.
If you’re also using IPRoyal, you can find your proxy link in the dashboard that resides in the client area.
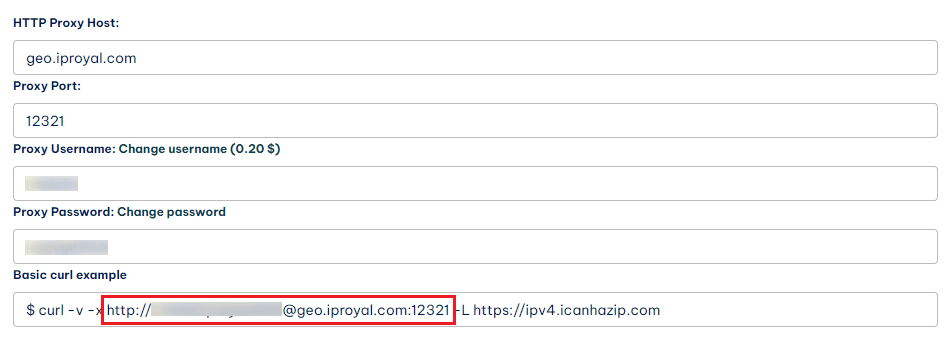
Register it as an environment variable using the export method in the terminal.
export HTTPS_PROXY=http://link-to-your-proxy.comThen you can use the proxy in the API call by providing an agent property that contains a newly created proxy agent object created by http-proxy-agent.
fetch('https://ipv4.icanhazip.com', {
  agent: new HttpsProxyAgent.HttpsProxyAgent(process.env.HTTPS_PROXY),
})
  .then((response) => response.text())
  .then((data) => console.log(data))
You can access the proxy link from the environment with process.env.HTTPS_PROXY. This will make sure that the proxy link, which might be for private use only, doesn’t leak when you share your code with others.
Fetch API vs. Axios
A popular package for making GET and POST requests in Node.js is Axios , which exposes a similar promise-based interface as Fetch API does.
Both Axios and Fetch API offer a similar set of features that should be more than enough for basic use cases. The syntax is also the same, barring minor property names.
One noticeable difference between the libraries is that Fetch API doesn’t need to be installed: it’s native to both browser and Node.js.
The second difference is that Axios can handle JSON without running a conversion function. You can just access the parameters of response.data just like you would any local JavaScript object. This can be quite convenient.
Here’s an example GET request in Axios (you need to install the library with npm install axios to run the code example):
import axios from 'axios';

axios.get('https://dummyjson.com/quotes')
  .then((response) => {
    response.data.quotes.forEach(quote => console.log(`${quote.quote} -- ${quote.author}`));
  });
Here’s an example POST request:
import axios from 'axios';

let todo = {
  todo: "Learn how to send POST requests with Fetch API",
  completed: false,
  userId: 26,
}

axios.post('https://dummyjson.com/todos/add', todo)
  .then((response) => { console.log(response.data) });
Fetch API is a good choice for one-off requests in scripts and small projects, while Axios is better for dedicated projects.
Conclusions
With the Fetch API, you can easily make HTTP requests from Node.js without installing any additional packages.
In this article, you learned how to use it to send GET and POST requests in Node.js and to inspect the status code of the response. You also discovered how proxies can be used to hide your real IP address when making requests, and what the differences are between Fetch API and Axios.
To practice more with the API, we suggest trying out requesting information from the many free JSON APIs available on the internet. Alternatively, you can build a web scraping project that requests HTML and extracts the necessary information with a library like node-html-parser .
FAQ
ReferenceError: fetch is not defined
This error means that you don’t have a recent-enough Node.js version where the native Fetch API interface is available. To solve that, you need to either update your Node.js version or use the node-fetch library that provides this functionality.
TypeError: fetch failed – cause: ConnectTimeoutError: Connect Timeout Error
This error happens if there is a timeout to connect to the website. Check if you’re connected to the internet and whether there’s nothing in the request that would take a long time such as a slow free proxy server.
TypeError: fetch failed – cause: Error: getaddrinfo ENOTFOUND http
This error happens if the URL cannot be found. Check if the URL you used is correct. In some cases, you might naturally encounter such URLs, such as when doing web scraping. In this case, it’s important to handle them via .catch() to not abort the whole program.
Author
Vilius Dumcius
Product Owner
With six years of programming experience, Vilius specializes in full-stack web development with PHP (Laravel), MySQL, Docker, Vue.js, and Typescript. Managing a skilled team at IPRoyal for years, he excels in overseeing diverse web projects and custom solutions. Vilius plays a critical role in managing proxy-related tasks for the company, serving as the lead programmer involved in every aspect of the business. Outside of his professional duties, Vilius channels his passion for personal and professional growth, balancing his tech expertise with a commitment to continuous improvement.
Learn more about Vilius Dumcius